Locking Down your Dev Environment with Webpack DevServer and mkcert
A simple guide to serving your application over HTTPS using Webpack DevServer and mkcert with your own custom hostname.
I probably don't need to try that hard to explain why it's important to make the effort to enable HTTPS on your websites. It's encrypted thereby helps to secure data that travels across the wire. This security gets you other benefits, including customers being more likely to trust the validity of your site (gotta have that little padlock icon!), as well as search engines, like Google, ranking your site higher in search results.
This makes sense for your public-facing production site, but why should you care about using HTTPS in your local dev environment? Well, you should generally make your development environment match your production environment as close as possible. This will give you greater confidence in your new changes and increases the likelihood that they will achieve the desired effect once you push them to production.
The more production-like your development environment is, the more confidence you can have in your releases.
In this article, I'll be demonstrating how easy this can be using Webpack DevServer and mkcert. You will need to already have an application using webpack to make use of this article. See the webpack documentation for steps on how to set things up if you haven't already.
So without further ado, let's get started!
Creating the Certificate with mkcert
To secure our development environment, we are going to be using a self-signed certificate. The easiest way to do this is to use the mkcert package. You can install the package and then use the CLI or API options, however you can also simply execute the package without installing it using npx. This is what we'll be doing since it's not something we'll have to do everytime we deploy our local environment.
First, open a terminal window and navigate to your application's root directory.
There are two commands that you'll need to run from your command line:
1. Create the Certificate Authority (CA)
npx mkcert create-ca
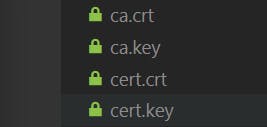
This command will create two files, ca.crt and ca.key, the certificate authority's certificate and the certificate's private key. This will be used to issue the site's certificate and corresponding private key.
2. Create the Certificate
npx mkcert create-cert --domains "localhost,127.0.0.1"
This command will create two more files, cert.crt and cert.key, the site's certificate and the certificate's private key. This certificate will be used by the browser along in combination with the CA's certificate to verify that the content getting sent from the server is genuine.
After running the above commands, you should have 4 files total.

These files should not be committed, so you should also modify your
.gitignoreaccordingly.
(optional) Adding to package.json
To make it easier to generate these files later on, we can combine the two commands and add it as a script to the scripts section in our package.json.
...
"scripts": {
  ...
  "generateCert": "npx mkcert create-ca && npx mkcert create-cert --domains \"localhost,127.0.0.1\""
  ...
},
...
Trusting the CA
Now that we created a CA and our own certificate, we need to "trust" the CA by adding it to our Trusted Root Certification Authorities. The following instructions describe the process for Windows, but I imagine the process for macOS would be relatively similar.
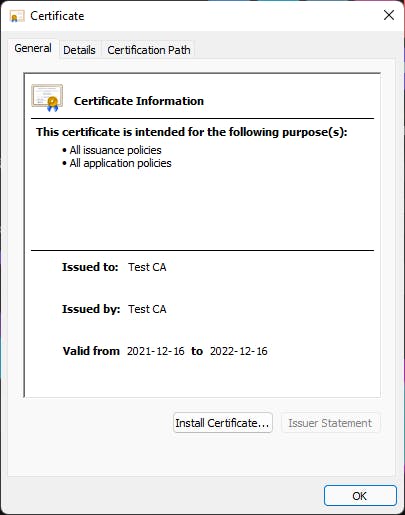
- Double-click the
ca.crtfile.

Click Install Certificate....
Select Current User > Next.
Select Place all certificates in the following store. Then click Browse and click Trusted Root Certification Authorities > OK. Then click Next.
Click Finish.
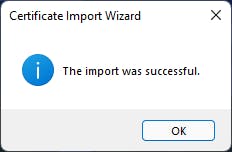
If all went well, you should get a dialog window pop up saying that the import was successful.

Now we should be ready to start using our certificate to serve our application over HTTPS!
Using the Certificate in Webpack DevServer
As mentioned at the beginning of the article, you should already have an application in which you're using Webpack. You'd also ideally have your Webpack configuration split up into at least two files:
webpack.dev.js(contains all your dev-related config)webpack.prod.js(contains all your prod-related config)- (optional)
webpack.commons.js(common configuration between dev and prod)
The reason you should have your config split up is because you should only be using DevServer in a development environment, so it has no place in any prod-related configuration.
Your basic DevServer configuration should look like something like this:
const devConfig = {
  ...
  devServer: {
    port: 3000,
  },
  ...
};
With this configuration, your application will be served on port 3000 over HTTP. The simplest way to start serving the application over HTTPS would be to specify server.type to be https.
const devConfig = {
  ...
  devServer: {
    port: 3000,
    server: {
      type: 'https',
    },
  },
  ...
};
Although this will get the application server over HTTPS, you will see that there's a warning in the url bar saying that it's not secure.

This is because when Webpack generates the certificate for us, it's not created by one of our Trusted Root Certificate Authorities. Luckily, we've already set up our own certificate and we just have to add the appropriate configuration to tell Webpack where to find it.
const fs = require('fs'); // helps us to read the cert files

const devConfig = {
  ...
  devServer: {
    port: 3000,
    server: {
      type: 'https',
      options: {
        key: fs.readFileSync('cert.key'),
        cert: fs.readFileSync('cert.crt'),
        ca: fs.readFileSync('ca.crt'),
      },
    },
  },
  ...
};
Using fs to access the cert files from the file system, we add our cert, key, and the trusted CA cert to server.options.
Now that Webpack is using the cert created using the CA cert that we trusted, we should now see the application served over HTTPS with that beautiful padlock. ❤️

(Bonus) Using your Custom Hostname
Your production hostname more than likely isn't localhost, so we can still take things a step further to match our dev environment to prod.
First you'll need to pull up your hosts file which should be in the following directory:
C:\Windows\System32\drivers\etc
Then add a line similar to this:
127.0.0.1 yourawesomesite.dev.com
This will tell your browser to point the given host to the provided address - in this case, 127.0.0.1 (aka localhost).
Obviously replace yourawesomesite.dev with your desired hostname.
Then add the following to your Webpack DevServer config:
const devConfig = {
  ...
  devServer: {
    ...,
    host: 'yourawesomesite.dev.com',
    allowedHosts: [
      'yourawesomesite.dev.com',
    ],
  },
  ...
};
This tells Webpack to serve your application at devServer.host and allows the application to be accessed at the modified host.
Finally you'll have to re-run the cert-generating command with your new hostname added to the --domain option in the comma-delimited value.
npx mkcert create-cert --domains "localhost,127.0.0.1,yourawesomesite.dev.com"
Now you should be able to view your application securely at your custom address!

Wrapping up
There you have it! With a few simple steps you can start serving your dev application over HTTPS as well as using your own hostname. By doing this, you make your development environment match your production environment more closely which can help you detect specific bugs that may only be seen in production. Ultimately this should help you avoid some unnecessary issues with future releases.
Thanks for reading, now go build some stuff!

